Tips Archive
Rotor Gap
The gap between the rotor tip and contact points on the distributor body after years of polishing may have as much as a 0.060 gap. Try a new rotor and/or distributor body and bring the gap down to 0.035. You can also build up the contact points with solder and then carefully file them back down to the correct gap. Rotors are available from Model A suppliers for about $5.00.
How to Restore Your Model A, Volume 7
Rattle in the Hub Cap
If your hub caps rattle or are loose, make sure the tabs on the inside of the wheel are pressed tightly against the wheel. Adding some clear silicone adhesive can also help to keep the caps secure.
If your hub caps rattle or are loose, make sure the tabs on the inside of the wheel are pressed tightly against the wheel. Adding some clear silicone adhesive can also help to keep the caps secure.
Tire Pressure
It is a good idea to check tire pressure in your tires periodically. It is an easy thing to forget if your car doesn't get much road time. If you have a spare tire, don't forget to check that tire also. The recommended tire pressure is 35 PSI.
It is a good idea to check tire pressure in your tires periodically. It is an easy thing to forget if your car doesn't get much road time. If you have a spare tire, don't forget to check that tire also. The recommended tire pressure is 35 PSI.
Car Starts but Doesn't Remain Running
If your Model A starts fine but doesn't keep running after a few minutes, it could be the engine is starved for fuel. There may be enough fuel in the bowl of the carburetor initially but after awhile runs out if the bowl doesn't refill. The culprit could be a needle valve stuck in the "closed" position. This happened to me even with a new needle valve! Remove the valve and clean it or replace with a new one.
If your Model A starts fine but doesn't keep running after a few minutes, it could be the engine is starved for fuel. There may be enough fuel in the bowl of the carburetor initially but after awhile runs out if the bowl doesn't refill. The culprit could be a needle valve stuck in the "closed" position. This happened to me even with a new needle valve! Remove the valve and clean it or replace with a new one.
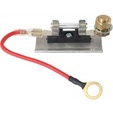
Poor Man's Disconnect
If you have a Safety Fuse (about $9.00 from Model A suppliers) attached to your starter switch, apply a zip tie with a 3-inch tail sticking up around the fuse to easily remove it. The fuse itself helps to protect your wiring and removing the fuse when your car is parked in public deters any would-be thieves. Battery disconnect switches cost between $13.00 to $32.00.
If you have a Safety Fuse (about $9.00 from Model A suppliers) attached to your starter switch, apply a zip tie with a 3-inch tail sticking up around the fuse to easily remove it. The fuse itself helps to protect your wiring and removing the fuse when your car is parked in public deters any would-be thieves. Battery disconnect switches cost between $13.00 to $32.00.
Model A Manufacture Date
Model A engines were made ahead of time and stamped with a number consisting of the letter A, a number up to 7 digits and a star. The Reference Desk Page on the MAFCA Web site has a link to an Engine Production Chart showing motor serial numbers, so it is possible to look up the manufacturer date of an engine.
However, it may have taken up to 3 months (or more in some cases) for engines to used at an assembly plant and put into a chassis. During that assembly the engine number was stamped onto the frame on the driver's side, just to the rear of the first body bolt. Therefore, "engine date" may not be the actual date the car was assembled.
Source: Rick Black, El Paso Texas
Wheel Colors
According to MAFCA 's Model A Restoration Guide & Judging Standards, wheel colors prior to June 1930 were black. Beginning June 1930 colored wheels were available as an option on all passenger cars except the DeLuxe Roadster, DeLuxe Phaeton, Convertible Sedan and DeLuxe Tudor which were equipped with colored wheels as standard equipment.
According to MAFCA 's Model A Restoration Guide & Judging Standards, wheel colors prior to June 1930 were black. Beginning June 1930 colored wheels were available as an option on all passenger cars except the DeLuxe Roadster, DeLuxe Phaeton, Convertible Sedan and DeLuxe Tudor which were equipped with colored wheels as standard equipment.
Source: Model A Restoration Guidelines, page 22-1
Alignment of Valve Stems and Hubcaps
On all wheels, including spares, the hubcaps were installed so the horizontal line of the Ford script was perpendicular to the axis of the valve stem. On most wheels mounted as spares, the valve stem was mounted at the top or 12 o'clock position. On most 19" wheels, when mounted on a properly assembled side mount spare wheel carrier, the valve stem cannot be mounted at the 12 o'clock position. The stem will appear at either the 11 o'clock or 1 o'clock positions. Either is acceptable.
On all wheels, including spares, the hubcaps were installed so the horizontal line of the Ford script was perpendicular to the axis of the valve stem. On most wheels mounted as spares, the valve stem was mounted at the top or 12 o'clock position. On most 19" wheels, when mounted on a properly assembled side mount spare wheel carrier, the valve stem cannot be mounted at the 12 o'clock position. The stem will appear at either the 11 o'clock or 1 o'clock positions. Either is acceptable.
Source: Model A Restoration Guidelines, page 22-4
Oil Pan Alignment Pins
These alignment pins are used to help align the oil pan and gasket when installing the pan. Cut the heads off of four 5/16"-18 x 3/4" bolts and cut a slot in the threaded shaft to accommodate a screw driver. Temporarily screw these pins into the block at the four corners of the pan opening leaving about 1/2" protruding. Use the pins to align the pan and gasket while installing a few bolts to hold the pan in place. Remove the pins and finish installation of the pan bolts. This works particularly well when installing the pan from underneath the car.
Muffler Tail Pipe Clamp
Have you ever wondered why the exhaust manifold on a Model A becomes distorted and leaks after years of operation—why the outlet of the manifold is no longer vertical? That condition is not normal; manifolds were not always that way.
There is a reason for this and it is not just because of continuous heating and cooling. Many people installing the muffler will tighten the clamp bolt where it fastens the muffler/tail pipe to the frame, obviously to keep it from rattling.
This bolt is only supposed to be little more than hand tight. That is the reason for the castellated nut and cotter pin—so that the bolt will not become un-screwed and fall off. The reason for this is to allow the tail pipe to slide forward and backward when the exhaust system is heated and cooled alternatively. If the clamp is over-tightened the exhaust manifold actually bends when the muffler expands.
Yes, cast iron will ‘bend’ under these conditions. So remember, do not over-tighten your muffler/tail pipe clamp.
Source: Tiny Tips For Your Model A
Use Self-locking Nuts
When you are putting an engine together, and you correctly torque the rod nuts and the main nuts the cotter pin holes may not line up. On the one hand you can over–tighten the nut to get the cotter pin in, or you can loosen the nut to get the cotter pin in. Both are bad ideas. So the solution is to use an all-metal self locking nut—makes life so easy and saves a lot of time fiddling with the damned cotter pins.
Okay, where do you get them? Aircraft Spruce and Specialty Co. Corona, Ca, 800-861-3192. or go online to:
http://www.aircraftspruce.com/catalog/hapages/an363.php
For your Model A mains, use 1/2-20UNF, part #AN363-820, for the rods, use 7/16-20UNF, part
#AN363-720. Makes life so easy, and now you can say that you have some bonafide aircraft parts in your engine. Makes it go faster you know.
Source: Bob M, Santa Clara Valley Chapter
Ford Script
The original ammeter used in the Model A did not have the Ford script on the face plate. However, ammeters with the script are available for those who would like to have the script.
The original ammeter used in the Model A did not have the Ford script on the face plate. However, ammeters with the script are available for those who would like to have the script.
Source: Mac's Auto Parts catalog
Auto Restorer Magazine
Auto Restorer Magazine (www.autorestorermagazine.com/) is a no-advertising publication with a lot of very good advice and articles on auto restoration. It is not specific to Model A cars but does contain many ideas that can be used in our hobby. Letters to the editor and the "Mechanic on Duty" column is particularly interesting.
Auto Restorer Magazine (www.autorestorermagazine.com/) is a no-advertising publication with a lot of very good advice and articles on auto restoration. It is not specific to Model A cars but does contain many ideas that can be used in our hobby. Letters to the editor and the "Mechanic on Duty" column is particularly interesting.
Gear Oil in Steering Gear Box
Many a Model A will have a grease fitting (commonly called a Zerk) on the top of the steering box. DO NOT PUT GREASE IN THE STEERING BOX! The proper lubrication is to use 600W gear oil.
Many a Model A will have a grease fitting (commonly called a Zerk) on the top of the steering box. DO NOT PUT GREASE IN THE STEERING BOX! The proper lubrication is to use 600W gear oil.
Tire Flat Spots
If your Model A is to be stored for a long period of time, it is a good idea to jack it up and place jack stands under the front and back axels to take the pressure off the tires. This is also a good time to detail those wheels and tires!
If your Model A is to be stored for a long period of time, it is a good idea to jack it up and place jack stands under the front and back axels to take the pressure off the tires. This is also a good time to detail those wheels and tires!
Paint your Manifold
The exhaust manifold on your Model A may be painted with the right kind of paint to look nice. Be sure the metal is clean, free from rust and other contaminants. Eastwood (eastwood.com) makes several Hi Temp coatings that can be used effectively. They advertise that their paint is good up to 1400 degrees Fahrenheit. The paint will cure with the addition of heat when the car is operated.
The exhaust manifold on your Model A may be painted with the right kind of paint to look nice. Be sure the metal is clean, free from rust and other contaminants. Eastwood (eastwood.com) makes several Hi Temp coatings that can be used effectively. They advertise that their paint is good up to 1400 degrees Fahrenheit. The paint will cure with the addition of heat when the car is operated.
While the Model A Club of Santa Barbara believes this information to be accurate and helpful, each person should verify for themselves any suggestions listed here. The Model A Club of Santa Barbara cannot be held responsible for any damage caused to any vehicle by persons using such information.
